
TypeScript in Framer Motion: 7 Patterns You Must Use Now
Adding animations to your React applications can transform a static, boring webpage into a premium, interactive experience. But if you’ve ever misspelled opacity as opcaity or struggled to remember the exact easing string for a spring animation, you know that doing this without type safety can lead to frustrating runtime bugs.
This article is specifically for developers, indie hackers, and SaaS owners who want to build stunning, type-safe user interfaces. By mastering TypeScript in Framer Motion, you get the best of both worlds: the fluidity and power of modern motion physics, backed by the rigorous autocomplete and error-checking of TypeScript. We will learn exactly how to type Variants, how to extend HTML motion props, and how to create reusable, bulletproof animation components instead of plain JavaScript.
By the end of this comprehensive 2000-word guide, you will have all the knowledge needed to write production-ready animations without guessing which props are allowed.
Key Takeaways
- Type Safety First: Writing Framer Motion animations with TypeScript eliminates trivial spelling bugs like
opcaity. - Intelligent Autocomplete: Access complex easing and physics transitions (
stiffness,damping,circOut) directly from your IDE. - Extend HTML Props safely: Use
HTMLMotionPropsto wrap default HTML nodes (like buttons) while preserving both DOM and animation attributes. - Custom Hooks: Extract Framer Motion logic into strongly typed generic React hooks (e.g.,
useScrollAnimation) for maximum reusability.
Table of Contents
- Why Use TypeScript in Framer Motion Instead of JavaScript?
- Setting Up Your React Project
- Typing the Core
motionComponents - Advanced Variants and Typing with TypeScript
- Handling Complex Gestures and Events
- Custom Hooks and Reusable Animation Components
- Performance Optimization Tips for Framer Motion
- Frequently Asked Questions (FAQ)
- Conclusion and Next Steps
Why Use TypeScript in Framer Motion Instead of JavaScript?
When you first start building web animations, it's tempting to use plain JavaScript for speed. However, as your codebase scales and your components become more complex, the benefits of TypeScript become undeniable.
Here are the top three reasons you should strictly use TypeScript when working with Framer Motion:
1. Zero Runtime Errors from Typographical Mistakes
In a plain JavaScript environment, passing an invalid property to a motion.div won't trigger any warnings until you run the app and notice the animation isn't working. With TypeScript, if you try to animate backgroundcolor instead of backgroundColor, the compiler will immediately highlight the error.
2. Autocomplete for Easing and Physics
Framer Motion supports a massive variety of transition properties, such as stiffness, damping, mass, and different ease curves (easeInOut, circOut, anticipate). Memorizing these is impossible. TypeScript provides intelligent autocomplete through your IDE, allowing you to explore the API directly from your editor.
3. Prop Drilling Confidence
As founders and developers building maintainable SaaS products, we often create reusable UI components (like Modals or Dropdowns) that support animations. When you type your component props correctly, any other developer on your team (or your future self) will know exactly what variant strings or transition configurations your component accepts.
Setting Up Your React Project
Before writing any code, you need a React environment configured with TypeScript. If you are using Next.js (check out our guide on how to use Framer Motion with Next.js) or Vite, TypeScript is likely already configured.
To start, install motion:
npm install motion# oryarn add motion# orpnpm add motion
Framer Motion is written in TypeScript natively, meaning you don't need to install any additional @types/motion/react packages. All the type definitions are exported directly from the main package.
Basic Import and Usage
Once installed, you can import the motion component and use it exactly as you would a regular HTML element, but with added animation superpowers.
import { motion } from "motion/react";export const SimpleBox = () => {return (<motion.divinitial={{ opacity: 0, scale: 0.8 }}animate={{ opacity: 1, scale: 1 }}transition={{ duration: 0.5 }}style={{ width: 100, height: 100, background: "blue" }}/>);};
This works perfectly out of the box. But what happens when we want to pass custom props to this component, or sequence animations using a Framer Motion delay?
Typing the Core motion Components
One of the most common requirements when building a UI library is wrapping a motion component to create a customized version of it. For example, you might want to create an AnimatedButton that acts exactly like a standard HTML <button>, but includes default hover effects.
To do this properly with TypeScript, you must extend the HTMLMotionProps interface provided by Framer Motion.
Extending HTMLMotionProps
Here is how you can type a custom animated button component so that it accepts both standard button properties (onClick, disabled) and Framer Motion properties (initial, animate):
import React from 'react';import { motion, HTMLMotionProps } from 'motion/react';// 1. Define your custom propsinterface AnimatedButtonProps extends HTMLMotionProps<"button"> {label: string;variant?: 'primary' | 'secondary';}// 2. Apply to the componentexport const AnimatedButton: React.FC<AnimatedButtonProps> = ({label,variant = 'primary',...rest}) => {const backgroundColor = variant === 'primary' ? '#4F46E5' : '#E5E7EB';const textColor = variant === 'primary' ? '#FFFFFF' : '#111827';return (<motion.buttonwhileHover={{ scale: 1.05 }}whileTap={{ scale: 0.95 }}style={{backgroundColor,color: textColor,padding: '10px 20px',borderRadius: '8px',border: 'none',cursor: 'pointer',}}{...rest} // Passes down all motion and standard HTML props safely>{label}</motion.button>);};
By using HTMLMotionProps<"button">, you ensure your users can still attach onClick handlers or standard aria-labels without the TypeScript compiler complaining.
The Problem with any
Never fall into the trap of using any for your motion component props! If you do, you completely bypass the type checker, rendering TypeScript useless and risking production crashes.
Advanced Variants and Typing with TypeScript
Framer Motion Variants are the most powerful feature of the library. They allow you to define animation states (like "hidden" and "visible") outside of your component tree, making your JSX much cleaner and allowing you to orchestrate complex staggered animations.
To type Variants correctly, you must import the Variants type from the library.
Strictly Typing the Variants Object
import { motion, Variants } from 'motion/react';// Strictly typing the variants objectconst cardVariants: Variants = {hidden: {opacity: 0,y: 50,transition: { duration: 0.3 }},visible: {opacity: 1,y: 0,transition: {type: "spring",stiffness: 100,damping: 12,staggerChildren: 0.1}},hover: {scale: 1.02,boxShadow: "0px 10px 20px rgba(0,0,0,0.1)"}};export const AnimatedCardList = () => {return (<motion.divinitial="hidden"animate="visible"whileHover="hover"variants={cardVariants}>{/* Child components will automatically inherit the generic string states */}<motion.div variants={cardVariants}>Item 1</motion.div><motion.div variants={cardVariants}>Item 2</motion.div><motion.div variants={cardVariants}>Item 3</motion.div></motion.div>);};
Why is this important?
If you simply defined const cardVariants = { ... } without the : Variants type annotation, TypeScript would infer it as a standard object. If you accidentally added a property like bckgroundColor instead of backgroundColor, TypeScript wouldn't catch it until you passed it to the variants prop deep in your React tree. By assigning the : Variants type upon declaration, the compiler verifies the object immediately.
Handling Complex Gestures and Events
Framer Motion includes robust gesture recognition for drag, pan, hover, and tap events. When you need to trigger arbitrary logic during these events (like updating a database or changing state), you rely on the event callbacks.
Understanding the types provided for these callbacks is crucial for building interactive, error-free interfaces.
PanInfo and Drag Events
When dragging an element, you often need to know the offset, velocity, or specific point data. Framer Motion provides the PanInfo type for this exact use case.
import { motion, PanInfo } from 'motion/react';export const DraggableBall = () => {// Strongly typing the drag handlerconst handleDragEnd = (event: MouseEvent | TouchEvent | PointerEvent, info: PanInfo) => {console.log("Drag distance X:", info.offset.x);console.log("Drag velocity Y:", info.velocity.y);if (info.offset.x > 200) {alert("Swiped right!");}};return (<motion.divdragdragConstraints={{ left: 0, right: 300, top: 0, bottom: 0 }}onDragEnd={handleDragEnd}style={{width: 60,height: 60,borderRadius: '50%',backgroundColor: '#EC4899',cursor: 'grab'}}whileDrag={{ cursor: 'grabbing', scale: 1.2 }}/>);};
Using PanInfo saves you from having to guess or manually inspect console.log(info) to figure out what data is accessible within the gesture event.
Custom Hooks and Reusable Animation Components
For indie hackers and developers building SaaS templates, reusability is key. Instead of writing the same animations repeatedly, you can extract your Framer Motion logic into custom, fully typed React hooks.
Building a useScrollAnimation Hook
Here’s an example of an intersection observer animation hook that triggers a slide-up effect when an element scrolls into the viewport.
import { useAnimation, Variants, useInView } from 'motion/react';import { useEffect, useRef } from 'react';interface ScrollAnimationOptions {amount?: "some" | "all" | number;delay?: number;}export const useScrollAnimation = <T extends HTMLElement = HTMLDivElement>(options: ScrollAnimationOptions = {}) => {const controls = useAnimation();const ref = useRef<T>(null);const isInView = useInView(ref, {amount: options.amount || 0.2,once: true});useEffect(() => {if (isInView) {controls.start('visible');}}, [controls, isInView]);const variants: Variants = {hidden: { opacity: 0, y: 30 },visible: {opacity: 1,y: 0,transition: {duration: 0.6,delay: options.delay || 0,ease: "easeOut"}}};return { ref, controls, variants };};
You can then consume this highly reusable hook in your components with absolute type safety:
import { motion } from 'motion/react';import { useScrollAnimation } from './useScrollAnimation';export const FeatureSection = () => {const { ref, controls, variants } = useScrollAnimation<HTMLElement>({ delay: 0.2 });return (<motion.sectionref={ref}initial="hidden"animate={controls}variants={variants}><h2>Amazing Features</h2><p>This section elegantly slides into view as you scroll.</p></motion.section>);};
Performance Optimization Tips for Framer Motion
Framer Motion is incredibly performant thanks to its hardware-accelerated transforms, but integrating it heavily can increase your JavaScript bundle size. While TypeScript itself compiles away and adds zero runtime overhead, you can still write more performant code by correctly implementing Framer Motion's lazy loading features.
Leveraging LazyMotion and m Components
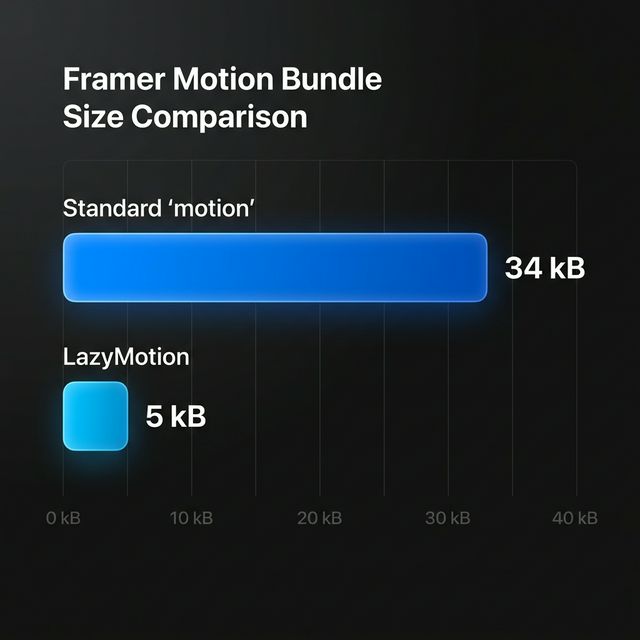
Instead of importing the standard motion component, which includes the entire animation engine synchronously, you can use LazyMotion and the m component to drastically reduce your initial load time (from ~34kB down to ~5kB gzipped).
import { LazyMotion, domAnimation, m } from "motion/react"export const OptimizedApp = () => {return (<LazyMotion features={domAnimation}><m.div animate={{ opacity: 1 }} /></LazyMotion>)}
By ensuring you wrap your app in LazyMotion, the heavy animation payload is only loaded when strictly necessary, drastically improving your Core Web Vitals and SEO rankings.
Frequently Asked Questions (FAQ)
To offer further clarity, here are some commonly asked questions regarding using TypeScript in Framer Motion.
What are the basic requirements to start using Framer Motion with TypeScript?
You need a React project environment (like Next.js or Vite) correctly configured with TypeScript. You only need to install the motion/react package via NPM or Yarn. Framer Motion includes its own native .d.ts type definitions, meaning no additional @types installations are necessary.
How do you strictly type custom components in Framer Motion?
To type a custom animated component, you should extend the HTMLMotionProps interface from Framer Motion. This allows your custom component to inherit both standard HTML attributes like onClick and Framer-specific animation props like initial and animate, preventing TypeScript compilation errors.
Does using TypeScript with Framer Motion affect animation performance?
No, using TypeScript does not negatively affect Framer Motion performance. TypeScript is a static analysis tool that compiles down to raw JavaScript before execution. It adds zero weight to your runtime bundle while completely preventing typographical UI errors during development.
Conclusion and Next Steps
Implementing TypeScript in Framer Motion drastically improves your developer experience. By enabling rich code completion, strictly typing your Variants, and extending HTMLMotionProps, you guarantee that your animations are not only gorgeous but completely resilient against runtime property errors. The leap from plain JavaScript to TypeScript ensures your application scales efficiently.
Stop wasting hours building complex animated components from scratch.
If you are an indie hacker, developer, or agency looking to launch products faster with premium aesthetics, you don't have to reinvent the wheel. Use ogBlocks to get instant access to 70 production-ready beautifully animated React components. Everything in ogBlocks is built with TypeScript and Framer Motion—designed to dramatically accelerate your modern web development workflow.
Get started today and build the internet's next beautiful application!
Written by Karan
Karan is a React engineer and the founder of ogBlocks, building high-performance UIs for SaaS.